How to Make Organic Fertilizer from Kitchen Waste for Growing Sweet Potatoes in a Recycled Bucket
Growing sweet potatoes at home is an incredibly rewarding experience. Not only do you get to enjoy the taste of fresh, homegrown produce, but you also have the opportunity to create your own organic fertilizer from kitchen waste. This eco-friendly method not only reduces waste but also enriches the soil naturally, ensuring a healthy crop of sweet potatoes. In this article, we will guide you through the process of using kitchen garbage to create organic fertilizer for planting sweet potatoes in a recycled bucket.
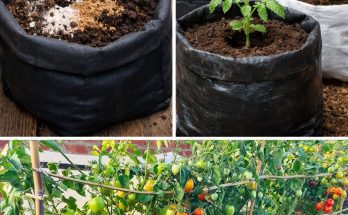
Why Grow Sweet Potatoes in a Recycled Bucket?
Growing sweet potatoes in a recycled bucket offers several benefits, especially for people with limited space. Whether you live in an apartment or have a small garden, containers provide an ideal solution for growing sweet potatoes without the need for a large garden plot. Here are some key reasons to grow sweet potatoes in a bucket.
-
-
Space Efficiency: A bucket can be placed on balconies, patios, or even windowsills, making it perfect for urban gardening.
-
Mobility: You can move the bucket around to ensure the plants get enough sunlight and to protect them from extreme weather.
-
Cost-Effective: Using recycled materials, such as old buckets, reduces costs and waste.
-
-
Easy Harvesting: Growing sweet potatoes in a container makes it easier to harvest, as you can simply tip the bucket over and remove the tubers.
Creating organic fertilizer from kitchen waste ensures that your sweet potato plants are nourished with natural nutrients, promoting healthy growth and an abundant harvest.
What You’ll Need
Before you get started, gather the following materials:
-
A recycled bucket (preferably with drainage holes)
-
Sweet potato slips or sprouts
-
Kitchen waste (such as vegetable peels, coffee grounds, eggshells, and fruit scraps)
-
Compost or garden soil (to create the base for your fertilizer mix
-
A small shovel or trowel
-
Watering can
Step-by-Step Guide to Growing Sweet Potatoes in a Recycled Bucket with Organic Fertilizer
1. Prepare the Recycled Bucket
The first step is to prepare your recycled bucket for planting. If the bucket doesn’t already have drainage holes, you’ll need to drill several holes in the bottom. These holes are essential for allowing excess water to escape, preventing waterlogging, and promoting healthy root growth.
Fill the bottom of the bucket with a layer of small rocks or gravel. This helps with drainage and ensures that the water doesn’t accumulate at the base of the container, which could cause the roots to rot
2. Make Organic Fertilizer from Kitchen Waste
Creating organic fertilizer from kitchen waste is simple and cost-effective. Instead of throwing away your vegetable scraps, coffee grounds, eggshells, and fruit peels, you can repurpose them to enrich the soil. Here’s how:
-
-
Vegetable Scraps: Scraps like carrot tops, onion skins, and potato peels can be composted to create nutrient-rich fertilizer. These materials are high in essential nutrients like potassium and phosphorus, which are vital for root development in plants like sweet potatoes
-
-
-
Coffee Grounds: Used coffee grounds are an excellent source of nitrogen, which promotes healthy foliage growth. Simply add the coffee grounds to your compost bin or directly into the bucket’s soil.
-
Eggshells: Crushed eggshells are rich in calcium and can help improve the structure of the soil, preventing issues like blossom end rot in sweet potatoes.
-
Fruit Scraps: Leftover fruit peels, cores, and seeds can also be added to the compost mixture. Fruits like bananas are particularly rich in potassium, which supports root growth and fruit development.
-
To create your organic fertilizer, start by collecting your kitchen waste in a compost bin. After a few weeks of composting, the material will break down into a dark, crumbly substance. If you don’t have a compost bin, you can also mix your kitchen scraps directly into the soil, but ensure the scraps are well decomposed to avoid attracting pests.
3. Prepare the Soil
In the recycled bucket, add a mixture of garden soil and compost. The soil should be well-draining, as sweet potatoes require good drainage to thrive. A typical mixture consists of 60% garden soil and 40% compost or organic matter. The compost will serve as the organic fertilizer for the plants, providing the necessary nutrients for healthy growth.
Mix the soil and compost together thoroughly to ensure an even distribution of nutrients. This mixture will create a nutrient-rich environment for your sweet potatoes to grow
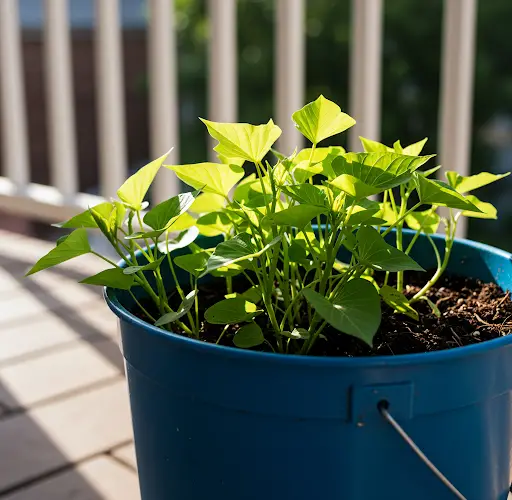
4. Plant the Sweet Potato Slips
Now that your bucket is ready, it’s time to plant the sweet potato slips. Sweet potatoes grow from slips, which are small shoots that sprout from the tuber. You can buy slips from a garden center or grow them yourself by placing a sweet potato in water until it sprouts.
Place the sweet potato slips into the soil mixture, making sure that the roots are covered and the leaves are above the surface. Space the slips about 4-6 inches apart to allow room for the plants to spread out as they grow. If you’re planting multiple slips in one bucket, make sure there is enough space for each plant to develop
5. Watering and Care
Water the sweet potato plants thoroughly after planting. Keep the soil consistently moist but not soggy. Sweet potatoes need regular watering, especially during the early stages of growth, but they don’t like sitting in water for long periods. Be sure to check the soil’s moisture level regularly to ensure it’s not too dry or too wet
As the plants grow, you may need to add more organic fertilizer. You can continue adding compost or use other kitchen scraps, like banana peels, to provide additional nutrients throughout the growing season.
6. Sunlight and Temperature
Sweet potatoes thrive in warm conditions, so place the bucket in a sunny spot where it will receive at least 6-8 hours of direct sunlight per day. If you’re growing sweet potatoes indoors, make sure they are placed near a south-facing window or under grow lights to ensure they get enough light.
Sweet potatoes prefer warm temperatures, ideally between 70°F and 85°F (21°C to 29°C). If you live in a cooler climate, consider growing sweet potatoes indoors or waiting for warmer weather to start the planting process
7. Harvesting Your Sweet Potatoes
Sweet potatoes typically take around 3-4 months to mature. Once the vines begin to die back, it’s time to harvest your sweet potatoes. Gently tip the bucket over and carefully remove the tubers from the soil. Be careful not to damage the sweet potatoes during harvesting, as they are delicate.
After harvesting, let the sweet potatoes cure for a week or two in a warm, dry place to allow the skins to toughen and improve their flavor.
Benefits of Using Kitchen Waste as Fertilizer
-
-
Sustainability: Reusing kitchen scraps reduces waste and minimizes your environmental impact
-
Cost-Effective: You don’t need to purchase chemical fertilizers, as the compost from kitchen waste is free and provides natural nutrients.
-
-
Nutrient-Rich: Kitchen waste, when properly composted, provides essential nutrients for plants, promoting healthy root development and strong growth.
Conclusion
Growing sweet potatoes in a recycled bucket with organic fertilizer made from kitchen waste is a simple, sustainable, and rewarding gardening method. By repurposing kitchen scraps, you can create a nutrient-rich environment that encourages healthy growth and yields a bountiful harvest. Whether you’re a seasoned gardener or a beginner, this approach allows you to grow delicious sweet potatoes at home with minimal effort and cost. Happy gardening.