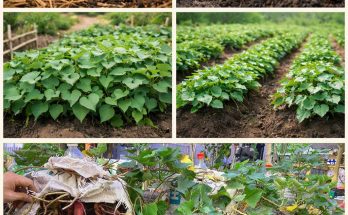
Grow Chili Peppers in Soil Bags for the Family – No Need to Buy Chili from the Market Anymore
Growing chili peppers at home is an excellent way to ensure a steady supply of fresh, organic chilies for your family’s culinary needs. If you have limited space or poor soil conditions, growing chilies in soil bags is an efficient and convenient method. This technique allows you to cultivate healthy chili plants without requiring a traditional garden bed. By following the right steps, you can enjoy an abundant harvest of homegrown chili peppers year-round and significantly reduce your dependency on store-bought chilies.
Benefits of Growing Chili Peppers in Soil Bags
1. Space-Saving and Portable
Soil bags take up minimal space and can be placed on balconies, patios, or rooftops, making them ideal for urban gardeners. They can be easily moved around to optimize sunlight exposure.
2. Better Soil Control
Using soil bags allows you to create the perfect growing medium, reducing the risk of soil-borne diseases and pests. You can customize the soil mixture for optimal chili plant growth.
3. Water Efficiency
Soil bags retain moisture effectively while allowing excess water to drain, preventing waterlogging and root rot.
4. Higher Yield and Better Quality
Chili plants grown in controlled soil conditions produce healthier fruits with better flavor, color, and spice intensity.
How to Grow Chili Peppers in Soil Bags
1. Choosing the Right Soil Bags
Select high-quality grow bags made of breathable fabric or durable plastic. Fabric bags are preferable because they allow air pruning, which prevents roots from becoming tangled and promotes stronger plant development. The recommended size is 5 to 10 gallons per plant.
2. Preparing the Soil Mix
Chili plants thrive in well-draining, nutrient-rich soil. Prepare a soil mix using:
-
- 60% garden soil or loamy soil
-
- 20% organic compost (such as vermicompost or decomposed manure)
- 10% coco peat or perlite (for aeration and moisture retention)
- 10% sand or rice husk (for drainage)
Mix the components thoroughly before filling the soil bags.
3. Selecting the Best Chili Varieties
Choose chili varieties that suit your climate and culinary preferences. Popular varieties include:
-
- Cayenne pepper (hot and versatile)
-
- Jalapeño (medium heat, ideal for stuffing)
- Thai chili (intense spice, great for sauces)
- Bell peppers (mild, sweet flavor)
- Habanero (extremely spicy, excellent for hot sauces)
4. Sowing the Seeds or Transplanting Seedlings
-
- If starting from seeds, plant them in seed trays or small containers filled with a light potting mix. Keep the soil moist and provide warmth (25–30°C) for faster germination.
- Once seedlings develop 4-6 true leaves, transplant them into the soil bags, spacing them adequately to allow proper growth.
- If using store-bought seedlings, ensure they are healthy and free from pests before planting.
5. Providing the Right Growing Conditions
Chili plants require specific conditions for optimal growth:
-
- Sunlight: Ensure they receive 6-8 hours of direct sunlight daily.
-
- Watering: Keep the soil evenly moist but avoid overwatering. Allow the top inch of soil to dry between watering.
- Temperature: Chili peppers grow best in warm temperatures (20–30°C). Protect them from extreme cold or frost.
- Fertilization: Use organic fertilizers such as compost tea, fish emulsion, or balanced NPK fertilizers (10-10-10) every 2-3 weeks.
6. Supporting the Plants
As chili plants grow, they may need support to prevent branches from breaking under the weight of the fruits. Use bamboo stakes or trellises to provide stability.
7. Pest and Disease Management
Common chili plant pests include aphids, whiteflies, and spider mites. To prevent infestations:
-
- Spray neem oil or insecticidal soap regularly.
- Introduce beneficial insects like ladybugs to control pests naturally.
- Remove infected leaves to prevent disease spread.
8. Harvesting Your Chilies
Chili peppers take 60-90 days to mature, depending on the variety. Harvest when they reach the desired size and color. Use scissors to cut the chilies, leaving a small stem attached to prevent plant damage.
Tips for Continuous Chili Production
-
- Regularly prune your plants to encourage bushier growth and increased yields.
- Rotate your crops to prevent soil depletion and disease buildup.
- Save seeds from your best chilies for future planting.
- If growing in a colder climate, bring soil bags indoors during winter or use greenhouse setups.
Conclusion
Growing chili peppers in soil bags is a practical and rewarding method for home gardeners. With proper care, you can enjoy a year-round supply of fresh, pesticide-free chilies, reducing your reliance on market-bought produce. Whether you prefer mild bell peppers or fiery habaneros, this approach ensures that you always have the perfect spice for your favorite dishes right at home. Start planting today and experience the joy of harvesting your homegrown chilies!