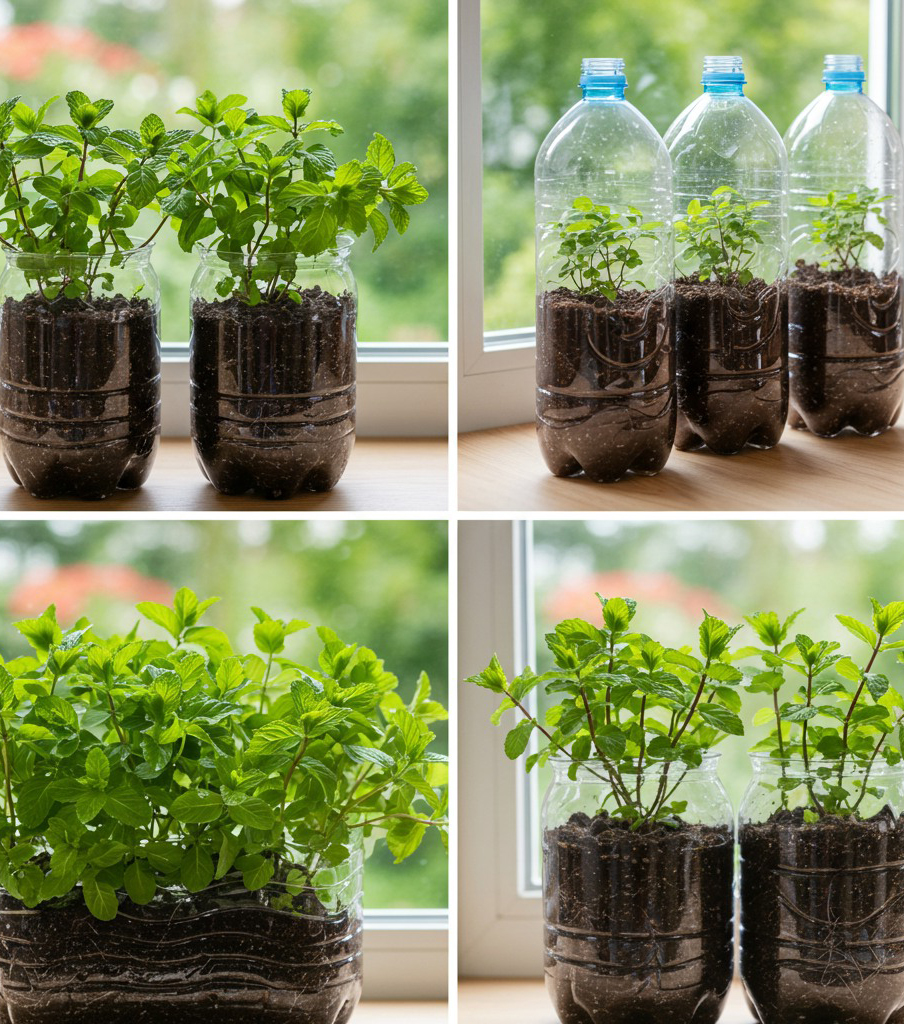
A simple and eco-friendly way to propagate mint is by using recycled plastic bottles. This method not only saves money but also helps reduce waste while providing a steady supply of fresh mint for your culinary needs.
Why Propagate Mint from Cuttings?
There are several advantages to growing mint from cuttings instead of starting from seed:
-
-
Faster results: Cuttings root and establish more quickly than seeds germinate.
-
Guaranteed flavor: The new plants will be clones of the parent, ensuring the same taste and aroma.
-
Eco-friendly: Reusing plastic bottles reduces waste and makes gardening more sustainable.
-
-
Low-cost method: No need to purchase pots or trays—your materials are essentially free.
Selecting Healthy Mint Stems
Choose a healthy mint plant with vibrant green leaves and no signs of pests or disease. The best stems for cuttings are young but mature enough to be sturdy—about 10–15 cm long. Avoid stems that are too woody or those that have already flowered, as they tend to root more slowly.
Preparing the Plastic Bottles
You can use standard water or soda bottles for this project. Clear bottles work best because they allow you to monitor root growth.
Steps:
-
-
Remove the label and wash the bottle thoroughly.
-
Cut the bottle about one-third from the top.
-
-
If you’re making a simple rooting jar, keep the bottom portion and discard the top.
-
For a self-watering design, invert the top part into the bottom, threading a cotton wick through the cap to draw up water from below.
This setup is lightweight, portable, and can be placed on a windowsill, balcony, or garden shelf.
Taking and Preparing Mint Cuttings
-
-
Cut the stem just below a leaf node (the point where the leaves join the stem). This is where roots will emerge.
-
The cutting should be about 10 cm long with at least two sets of leaves.
-
-
Remove the lower leaves, leaving the top pair intact to minimize water loss.
-
If desired, dip the cut end in rooting hormone, though mint generally roots well without it.
Rooting Mint Cuttings in Bottles
Fill the bottle with clean water, enough to submerge the leaf node but not the leaves themselves. Place the cuttings inside, making sure the leaves stay above the water to prevent rot.
Keep the bottle in a warm location with bright, indirect light. Avoid direct midday sun, as it can heat the water too much and damage the cuttings. Mint prefers temperatures between 18–24°C for optimal root development.
Change the water every 2–3 days to keep it fresh and oxygenated. Within a week, you should see small white roots forming. After two weeks, roots will be long and strong enough for transplanting.
Transplanting the Rooted Cuttings
Once the roots are about 5–7 cm long, prepare a pot or garden bed with rich, well-draining soil. Mint thrives in slightly moist conditions and benefits from soil enriched with compost.
Steps:
-
-
Fill your container with potting mix.
-
Make a hole deep enough to accommodate the roots without bending them.
-
Gently place the rooted cutting in the hole and cover the roots completely.
-
-
Water thoroughly and keep the plant in partial shade for a few days to help it adjust before moving it to a sunnier spot.
Caring for Mint Plants
Mint is a hardy herb, but it grows best with the right care:
-
-
Sunlight: Prefers partial to full sun but can tolerate some shade.
-
Watering: Keep the soil consistently moist but not waterlogged.
-
Fertilizing: Apply a diluted liquid fertilizer every 4–6 weeks during the growing season.
-
-
Pruning: Regularly trim the tips to encourage bushy growth and prevent flowering.
If you plant mint in the ground, consider using a barrier or container to prevent it from spreading aggressively.
Continuous Propagation
One of the best things about this method is that you can create a continuous cycle of new mint plants. Every few weeks, take fresh cuttings from your healthiest plants and start them in bottles again. This ensures a year-round supply of fresh mint and allows you to share plants with friends and family.
Benefits of Using Plastic Bottles for Mint Propagation
-
-
Recycling: Reduces plastic waste by giving bottles a second life.
-
-
-
Visibility: Clear sides let you track root development without disturbing the plant.
-
Compact: Perfect for small spaces like apartment balconies or kitchen counters.
-
Mobility: Easy to move indoors during bad weather or extreme heat.
-
Final Thoughts
Propagating mint from cuttings in recycled plastic bottles is a simple, cost-effective, and eco-friendly gardening project. It’s perfect for beginner gardeners and satisfying for seasoned growers looking for a sustainable approach. In just a couple of weeks, you can turn a single mint stem into a thriving plant that will provide fresh leaves for months.
With minimal effort and materials you likely already have at home, you can enjoy the refreshing taste and aroma of home-grown mint anytime—and take pride in knowing you grew it yourself while helping reduce waste.