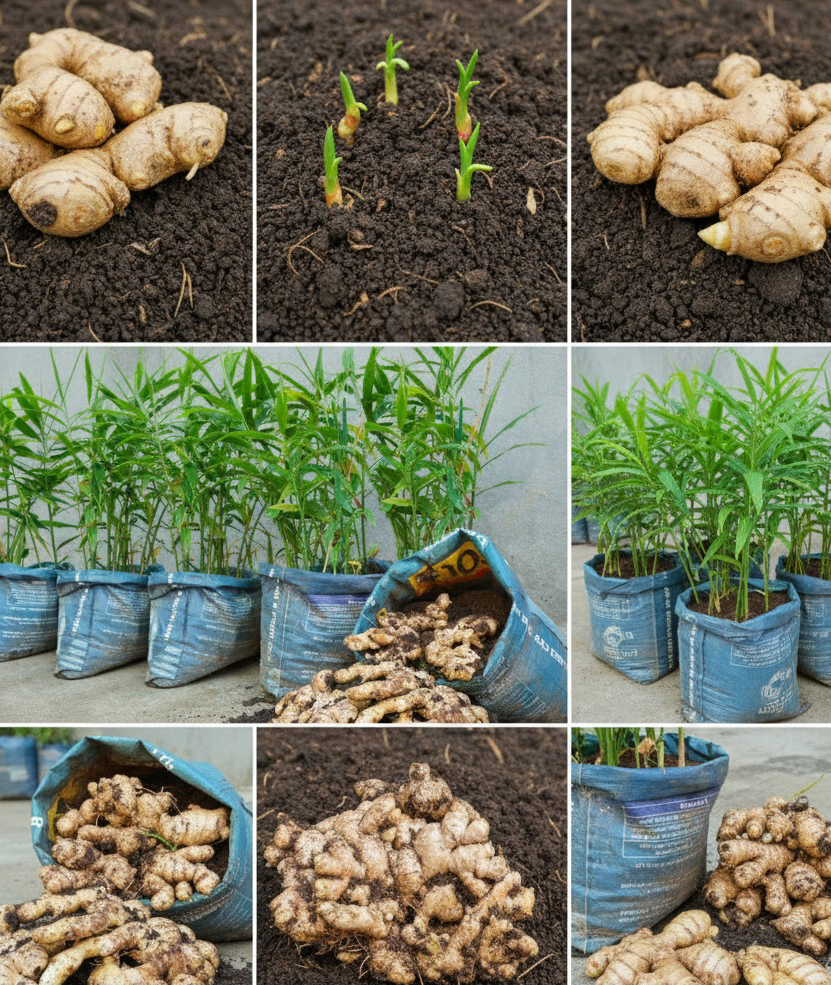
One of the most efficient and space-saving ways to grow ginger is in a grow bag or even a recycled sack. This method not only requires minimal space but also promotes better drainage and allows you to harvest fresh ginger faster. Whether you’re a beginner or an experienced gardener, growing ginger in bags is a simple and rewarding gardening idea.
Why Grow Ginger in a Bag?
Growing ginger in bags has several advantages over traditional in-ground methods:
-
-
Space-saving: Ideal for balconies, patios, rooftops, or small yards.
-
Mobility: Bags can be moved to optimize sunlight or avoid bad weather.
-
Improved drainage: Prevents waterlogging, which is crucial for ginger.
-
-
Easier harvesting: You can tip the bag to harvest without digging deep into the ground.
-
Recycling opportunity: You can reuse rice sacks, compost bags, or shopping totes.
What You Need to Get Started
Before planting, gather the following materials:
-
-
Fresh ginger rhizomes: Choose plump, healthy pieces with visible “eyes” (growth buds).
-
A grow bag or recycled sack: At least 12 inches deep and 12–16 inches in diameter.
-
-
-
Potting mix: Loose, well-draining soil enriched with compost or organic matter.
-
Watering can: For regular, gentle watering.
-
Optional: Compost, organic fertilizer, mulch (like dry leaves or straw).
-
Step-by-Step Guide to Growing Ginger in a Bag
1. Choose and Prepare the Ginger
Start with fresh ginger rhizomes purchased from a garden center or organic grocery store. Look for pieces that are firm with visible nodes or buds. If needed, soak them in warm water overnight to stimulate sprouting.
Cut large rhizomes into smaller chunks, each with at least one or two buds. Let them air dry for a day to form a callous over the cut surfaces—this helps prevent rotting when planted.
2. Prepare the Grow Bag
Choose a bag that is deep and wide enough to allow ginger roots to expand. If you’re reusing a rice or compost sack, poke several holes in the bottom for drainage.
Fill the bag about one-third full with your potting mix. A good ginger mix includes:
-
-
1 part compost
-
-
1 part garden soil
-
1 part sand or coco peat (for drainage)
Make sure the soil is light and crumbly, not compacted.
3. Plant the Ginger
Place the ginger pieces on top of the soil with the buds facing upward. Space them about 6 inches apart. Cover the pieces with another 2–3 inches of soil.
Water lightly to settle the soil around the rhizomes.
Caring for Ginger in a Bag
1. Watering
Ginger likes consistent moisture, but not soggy soil. Water lightly every few days or when the topsoil begins to dry. During hot periods, increase watering frequency.
Avoid overwatering, as stagnant water can cause the rhizomes to rot.
2. Sunlight
Ginger prefers partial shade or filtered sunlight. If growing in full sun, make sure to keep the soil moist and avoid overheating.
If growing indoors or on a balcony, place the bag where it gets 3–5 hours of gentle morning sun daily.
3. Feeding
After the plants begin to sprout and grow leaves (usually within 2–3 weeks), feed them with organic fertilizer or compost every 3–4 weeks. This promotes healthy foliage and bigger rhizomes.
You can use diluted liquid seaweed, compost tea, or vermicompost to nourish the plants naturally.
4. Adding Soil Over Time
As the ginger grows, it sends out new rhizomes horizontally. To support their development, add more soil to the bag every few weeks until the bag is full. This also helps protect the roots and keeps the rhizomes underground.
Harvesting Ginger
Ginger typically takes about 8 to 10 months to reach full maturity, but you can begin harvesting small amounts as early as 4 months.
To harvest:
-
-
Gently pull aside the topsoil and remove a few pieces of fresh “baby ginger” while leaving the rest to grow.
-
-
For a full harvest, wait until the leaves begin to yellow and die back.
-
Tip the grow bag onto a tarp or large container and collect the rhizomes.
Brush off excess soil, rinse the ginger, and allow it to dry in a cool, shady place before storing.
Tips for Faster and Bigger Harvest
-
-
Start with pre-sprouted ginger for a head start.
-
Use well-draining, nutrient-rich soil.
-
-
-
Fertilize regularly with compost or organic feeds.
-
Keep the plants in a warm, humid environment.
-
Remove weeds and damaged leaves to maintain plant health.
-
Final Thoughts
Growing ginger in a bag is a practical and creative way to enjoy fresh, homegrown ginger without needing a large garden. With just a little attention to watering, light, and soil conditions, your ginger plant will thrive and reward you with fragrant, flavorful roots that can be used for cooking, teas, or even natural remedies.
It’s a low-maintenance crop that grows slowly but steadily—and once you harvest your first bag-grown ginger, you’ll want to plant more right away.
Why not give it a try this season and experience the joy of harvesting your own fresh ginger at home?