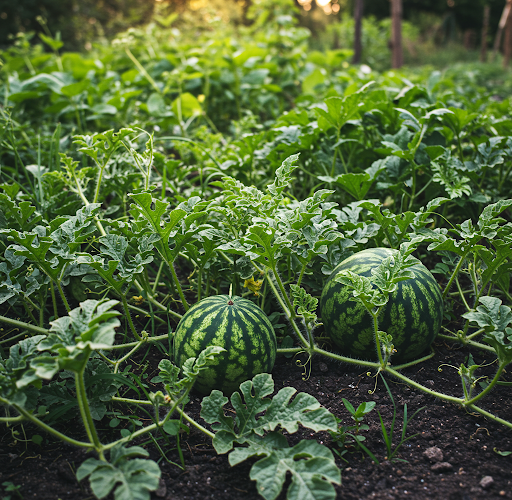
Grow watermelon in this way, the fruit will be big and sweet, grow watermelon in a bag of soil
Growing Watermelons in a Bag of Soil: A Simple Method for Big, Sweet Fruits
Watermelons are a summertime favorite, loved for their juicy, refreshing taste. While traditionally grown in large garden beds or sprawling fields, an innovative method—growing watermelons in a bag of soil—offers a space-saving and efficient way to cultivate these delicious fruits. This technique is ideal for those with limited garden space, ensuring optimal soil conditions and ease of maintenance. By following the right steps, you can enjoy large, sweet watermelons from the comfort of your own backyard or balcony.
Why Grow Watermelons in a Bag of Soil?
Growing watermelons in soil bags offers numerous advantages:
-
- Space Efficiency: No need for large garden plots—this method works well on patios, balconies, or small backyards.
-
- Improved Soil Quality: You can control soil composition, ensuring the best nutrients for watermelon growth.
- Reduced Weeding: Since plants grow in a confined space, fewer weeds compete for nutrients and water.
- Enhanced Drainage: Bags provide good aeration and prevent waterlogging, reducing the risk of root rot
- Pest Control: Elevating the growing area can help deter some soil-borne pests and diseases.
Materials Needed for Growing Watermelons in a Soil Bag
To get started, gather the following materials:
-
- A high-quality bag of soil (potting mix or compost-rich garden soil)
- Watermelon seeds or seedlings (choose a compact or container-friendly variety
- A sunny location (watermelons require at least 6-8 hours of sunlight daily)
- A knife or scissors (for cutting drainage holes)
- Mulch or straw (optional, for moisture retention)
- A trellis or support structure (if growing vertically)
- Fertilizer rich in phosphorus and potassium
- Watering can or hose for regular irrigation
Step-by-Step Guide to Growing Watermelons in a Bag of Soil
1. Choosing the Right Watermelon Variety
Not all watermelons grow well in confined spaces. For best results, select a compact variety such as:
-
- Sugar Baby: A small, sweet variety that matures quickly.
- Golden Midget: A compact watermelon with yellow skin and red flesh.
- Bush Sugar Baby: A space-saving variety that produces medium-sized fruits.
2. Preparing the Soil Bag
Place the bag of soil in a sunny location. Using a knife or scissors, cut several drainage holes in the bottom to prevent excess water from accumulating. Then, cut an opening on the top of the bag, making a rectangular or circular hole large enough for planting but leaving enough soil around the edges to maintain bag stability.
3. Planting the Seeds or Seedlings
If using seeds, plant 2-3 seeds directly into the soil, spacing them about 2 inches apart. Once the seedlings sprout and develop their first true leaves, thin them to the strongest one. If using seedlings, dig a small hole and gently plant them, ensuring the roots are well covered
4. Watering and Fertilizing
Watermelons need consistent moisture to thrive, especially during fruit development. Water deeply at least twice a week, ensuring the soil remains moist but not waterlogged. To encourage fruiting, use a balanced fertilizer with an emphasis on phosphorus and potassium, such as a 5-10-10 blend, applying it every 2-3 weeks.
5. Providing Support for Vines
If space is limited, you can train watermelon vines to grow vertically using a trellis or fence. Secure the vines gently with soft ties and provide slings (such as old pantyhose or cloth strips) to support growing fruits and prevent them from breaking off prematurely.
6. Controlling Pests and Diseases
Check plants regularly for common pests like aphids, cucumber beetles, and spider mites. Remove pests manually or use an organic insecticidal soap if necessary. Prevent fungal diseases by ensuring proper airflow around the plant and avoiding overhead watering.
7. Mulching for Moisture Retention
Mulch around the base of the plant with straw, dried grass clippings, or wood chips to help retain soil moisture, regulate temperature, and suppress weeds.
8. Pollination Assistance
Watermelons rely on pollinators like bees for fruit development. If pollination is low, manually transfer pollen from male flowers to female flowers using a small brush.
9. Harvesting Your Watermelon
Watermelons typically mature within 70-90 days, depending on the variety. To determine ripeness, look for these signs:
-
- The bottom of the watermelon (where it rests on the soil bag) turns yellow.
- The tendril closest to the fruit dries and turns brown.
- The rind becomes dull and resists being easily punctured by a fingernail.
When ready, use a sharp knife or pruning shears to cut the fruit from the vine, leaving a small portion of the stem attached.
Tips for a Successful Watermelon Harvest
-
- Monitor Soil Moisture: Overwatering can cause fruits to split, while underwatering can stunt growth.
- Provide Full Sun: Ensure plants receive at least 6-8 hours of direct sunlight daily for optimal fruit development.
- Use Black Plastic for Extra Warmth: Placing a black plastic sheet under the soil bag can help retain heat and speed up growth.
- Avoid Excess Nitrogen: While nitrogen promotes vine growth, too much can result in fewer fruits. Focus on phosphorus and potassium for better fruit development.
Final Thoughts
Growing watermelons in a bag of soil is an easy, space-saving, and effective method for home gardeners. By controlling soil quality, providing adequate support, and ensuring proper care, you can harvest large, sweet watermelons without the need for a traditional garden bed. Whether you have a small backyard, balcony, or patio, this method makes it possible to enjoy homegrown watermelons with minimal effort. Try it out and enjoy the fruits of your labor!
