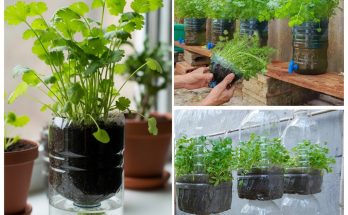
Easiest Way: How to Grow Tomatoes in Plastic Hanging Bottles
Growing your own tomatoes at home can be both fun and rewarding, and you don’t need a lot of space or expensive equipment to do it. One of the easiest, most affordable methods is using recycled plastic bottles to create hanging tomato planters. This method is simple, low-cost, eco-friendly, and perfect for balconies, patios, small gardens, or even indoor spaces.
Here’s a complete guide on how you can easily grow healthy, productive tomato plants in hanging plastic bottles.
Why Grow Tomatoes in Hanging Bottles?
Growing tomatoes in hanging bottles has several advantages:
-
-
Space-Saving:
Perfect for small areas where traditional gardening isn’t possible. -
Low Cost:
Makes use of inexpensive or recycled materials you likely already have at home.
-
-
Better Air Circulation:
Hanging plants receive more air circulation, which can reduce disease problems like fungal infections. -
Pest Control:
Keeping plants off the ground can minimize issues with pests and soil-borne diseases. -
Eco-Friendly:
Reuses plastic bottles, reducing waste.
This method is ideal for cherry tomatoes or other smaller varieties, which are lightweight and adapt well to container growth.
Materials You Will Need
-
-
Large plastic bottles (2-liter soda bottles or larger)
-
-
Tomato seedlings (cherry or small varieties recommended)
-
Good quality potting soil
-
Sharp knife or scissors
-
String, rope, or sturdy wire for hanging
-
Drill or a heated nail for making drainage holes
-
Water
Step-by-Step Instructions
1. Prepare the Plastic Bottle
Choose a strong, clean plastic bottle with a cap. A 2-liter bottle works well for one tomato plant.
-
-
Cutting the Bottle:
Cut the bottom part of the bottle off, about 4-5 inches from the base. This cut-out portion will serve as a funnel to make watering easier or can be used as a mini reservoir. -
Make Drainage Holes:
Using a drill or a heated nail, create small drainage holes around the neck of the bottle and near the base (now the top). This will prevent excess water from sitting inside and causing root rot.
-
-
Create Hanging Holes:
Make two small holes near the cut edge where you will attach the string or rope for hanging.
2. Prepare the Plant
Select a healthy tomato seedling. Remove it gently from its original container, being careful not to damage the roots.
Tip: It’s best to use a small, young plant rather than a large one, as it will adapt more easily to the confined space of a hanging bottle.
3. Insert the Plant
Turn the bottle upside down so the neck (where the cap is) points downward. Gently push the tomato seedling through the neck opening so that the roots stay inside the bottle and the leafy part comes out through the neck.
If the opening is too tight, you can carefully cut it slightly larger to avoid damaging the stem.
4. Fill with Soil
Carefully add potting soil into the bottle around the roots while holding the plant in place. Fill the bottle until it’s about two-thirds full.
Use a light, high-quality potting mix that retains moisture but also drains well. You can also mix in a slow-release fertilizer for better results.
Make sure the plant is secure and that the soil is firm but not too compacted.
5. Set Up the Hanger
Thread your string, rope, or wire through the holes near the top of the bottle and tie securely. Hang the bottle in a sunny location where your tomatoes will receive at least 6–8 hours of sunlight daily.
Popular locations include:
-
Balcony railings
-
Garden hooks
-
Tree branches
-
Overhead beams
Make sure the setup is stable enough to hold the weight of the plant, soil, and water.
6. Watering and Maintenance
-
-
Water Regularly:
Because hanging containers dry out faster than ground soil, frequent watering is essential. Check daily, especially in hot weather. Water slowly to allow the soil to absorb moisture without overflowing. -
Fertilize Occasionally:
Feeding your tomatoes with a balanced fertilizer every 2-3 weeks will promote healthy growth and abundant fruiting.
-
-
Prune When Necessary:
Remove any yellow leaves or suckers (small shoots that grow between the main stem and branches) to focus the plant’s energy on producing fruit. -
Monitor for Pests:
Check under the leaves regularly for signs of pests like aphids or caterpillars, and treat them promptly if needed.
Tips for Success
-
-
Choose Small Tomato Varieties:
Cherry tomatoes, grape tomatoes, and other small types are ideal for hanging containers because their fruits are lighter and the plants are less likely to break.
-
-
-
Secure the Plant:
As the plant grows, you may need to gently tie it to the hanging rope or add a small support to prevent it from snapping under its own weight. -
Rotate the Planter:
Rotate the bottle occasionally if one side is getting more sun to encourage even growth. -
Harvest Regularly:
Pick ripe tomatoes regularly to encourage the plant to produce more fruit.
-
Final Thoughts
Growing tomatoes in plastic hanging bottles is one of the easiest and most affordable ways to enjoy homegrown produce, even in limited spaces. With just a few basic materials and a little care, you can have fresh, delicious tomatoes right at your fingertips.
This simple DIY project not only recycles plastic bottles but also turns any sunny spot into a productive mini-garden. Whether you’re a beginner gardener or an experienced grower looking for a fun project, hanging bottle tomatoes are a fantastic option to try.
Start your hanging tomato garden today and enjoy the satisfaction of harvesting your own juicy, flavorful tomatoes at home!


